
Piecing with Ease with cutting templates:
First, I’m going to show you how easy it is to align fabric that has been cut out with cutting templates. This is especially useful when you are piecing a weird shaped piece of fabric on a weird angle and are struggling to get it aligned correctly.
The example below is pretty basic, but can be applied to any piecing. I cover paper piecing in more detail in this post.
If you are new to paper piecing just ignore this for now and come back to it after you read the other post. 🙂
For this tutorial I am using one of my cheater templates (see below) for the white piece, and whichever number the other piece is. 😀
1. Lay your fabrics over the sections where they will go (I actually piece them on the opposite side of the paper, but it’s easier to see the lines for tutorial purposes on the print side. So when I really do this, I do it on the opposite side of the paper. It still works here though because the print fabric is a mirrored piece (see below for more details on mirrored sections.)) Make sure that all lines are overlapped by at least 1/4 inch.

2. I move my base fabric out of the way so you can see the lines. Flip your fabric over and fold over the edge that is on the sewn line by 1/4 inch to 3/8 inch (no more, no less). Crease the fold with your finger.
*This is the best part about cutting templates!! If you cut around them exactly, then you can always know that whichever edge is going to be sewn down, can be folded over by the above amounts (1/4″ to 3/8″). Fold it evenly along the entire edge, and your piece will always cover the entire section! It will always be big enough! and you won’t ever have to play with what angle to fold your fabric to make it fit. You don’t have to fold it on the pattern either, I did here to show that I’m folding the correct edge.

3. Flip your fabric back over. Align the fold with the seam line. Make sure that all sides overlap the edges by at least 1/4″. (My patterns already have the seam allowance added, so the fabric only needs to reach the very edge of the outside of the pattern piece. If you are using a pattern that doesn’t have the seam allowance added, you will need to make sure your fabric extends at least 1/4″ beyond the paper.

4. Place your fabrics to paper piece, line up the crease in the top fabric with the sew line on the pattern. Now you just need to check that it’s not too far to one end of the sew line, but if you center it, it should be ok. Double check, and then start sewing! 🙂
See how easy that makes aligning your fabric with the section you’re piecing?!
Now let’s get back to cutting templates…
Cutting Templates: How-to:
Now let’s walk through the complete process of using cutting templates, starting with printing them out and then moving right on to cutting our fabric!
PRINT SETTINGS:

1. Set your paper SIZE to BORDERLESS 8.5inch x 11inch
2. Set SCALE 100% or NO SCALE.
3. You only need one COPY of each page, as you can use them over and over again. I usually print mine on card stock, but it doesn’t matter. Some people print them on freezer paper so they can iron them to the fabric while they cut. It’s up to you.
4. Print only the PAGES with the templates.
5. Cut around the outside of the shaded area of each template piece.

6. Place the template with print side up on fabric right side up.

7. Cut closely around the template.* It doesn’t have to be exact, but the closer the better. Cut off any odd left over fabric scraps that make your fabric piece a weird shape.


I use to always leave that little extra piece on the corner, as it’s not a big deal, but I find it easier to piece if my fabric is the exact shape as the template.*

*I use to say in my pattern instructions that if you want more wiggle room, cut generously around the templates. DON’T DO IT!
Here’s why: Cutting exactly around the template makes piecing your fabric so much easier! I will show you my tips on in the Paper Piecing Tutorial, but for the short version, it eliminates all the adjusting trying to get your fabric aligned just right, as well as making sure it covers all the edges.
8. Repeat until you have all your pieces for your block cut out.*

*As I cut, I lay my fabric pieces out as they will look in my block. This helps me make sure I don’t miss any and have to cut more fabric later. It also makes it easier when I start piecing so I don’t get my fabrics confused and piece them in the wrong place.
TIPS:
FUSSY CUTTING:
Fussy cutting with paper piecing is AWESOME! But can be a lot of guess work and luck when you are doing it without templates. Here’s my secret to perfect fussy cutting:
1. When you cut out your templates (Step 5), also cut out the center of the template.

2. In step 6, align your template over your fabric until you are happy with what you see through the template window.
*To help me remember how my templates align to the block, I drew an arrow on my template pointing to the center of the block. This helps me to orient my template correctly so my fabric designs are all pointing in the right direction. As of 2018, all my new patterns and some older updated patterns include an arrow on the cutting templates to so you don’t have to figure this out.

3. Cut exactly around the template (step 7). The closer you cut around the template, the better luck you will have when you piece that fabric.

4. Repeat as necessary.
CHEATER TEMPLATES:
When the design is favorable, I include a few cheater templates to expand the design possibilities of the block.

The cheater templates work in the exact same manner as mentioned above. Whether for fussy cutting or not.
The benefit of cheater templates is that they are awesome for those sections where you are using the same fabric for multiple sections. You save fabric, you have less seams making for a cleaner design, saves time by cutting and piecing less fabrics, you can use larger print designs for amazing fussy cutting.
Let me show you some examples of where you would use cheater templates:
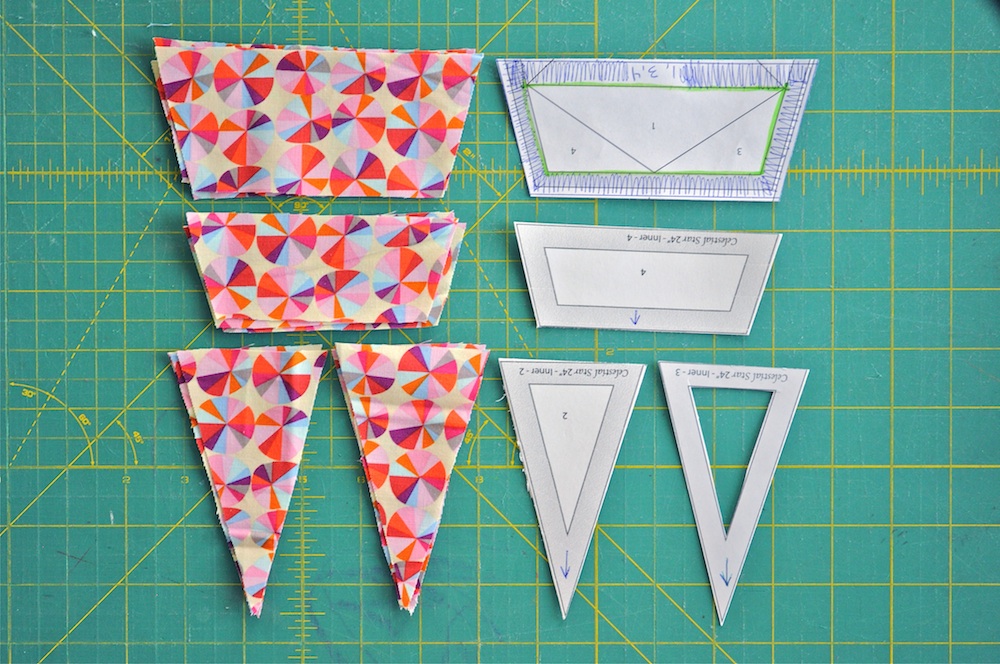
Here is one design I made with the Celestial Star pattern:

This template combines sections 1 and 2 in the outer pattern piece.


This template combines section 1, 2, 3 and 4 in the outer pattern piece.


If we alter the pattern just a little so it looks like this:

Then we can use this template to combine sections 1, 2, and 3 in the inner pattern piece.


MAKE YOUR OWN TEMPLATES:
If you have other shapes that you want to create with a single piece of fabric, here is how you can make your own cheater templates, or templates for another pattern that doesn’t have cutting templates.
1. Print out a copy of the pattern on cardstock, at 100% or No scale.
2. Mark the template you want to make.

3. Measure 3/8″ from each marked line, and draw a line. This will create an outline around the entire pattern.


4. Color/shade in the new border.

5. Cut around the outside of your new shaded area. You can stop here and start using your template.

6. Or cut out the center and use it for fussy cutting. I marked my border with the sections it includes.

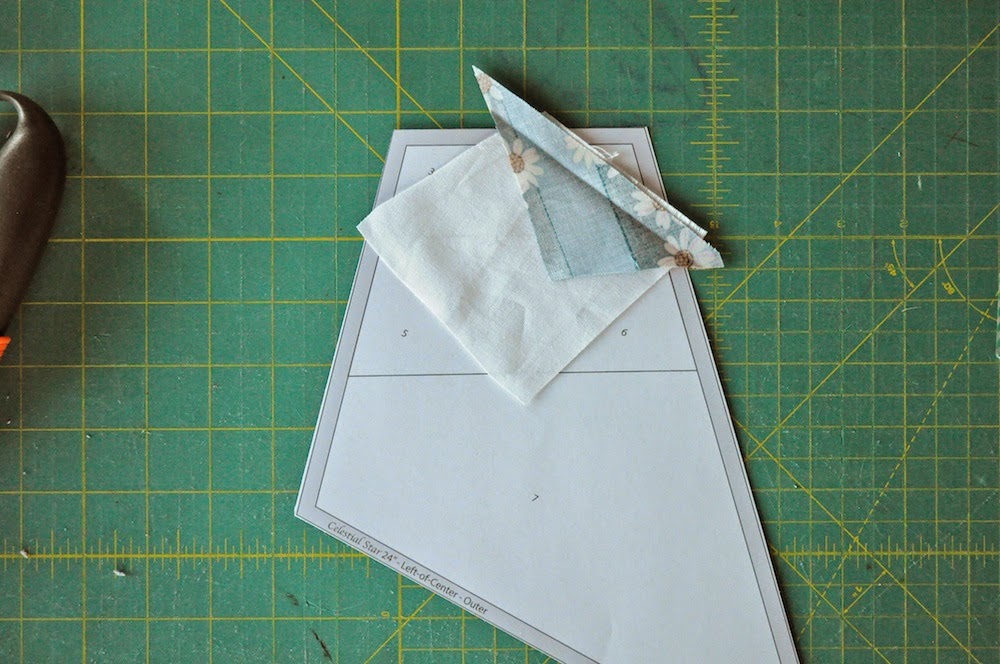
MIRRORED SECTIONS:
There are a few sections in this pattern that are mirror images, as it were of another section in the pattern. They are:

If I am not fussy cutting these prints I will often cut them out in like manner as cutting solids, accordion style. BE CAREFUL, it’s easy to mess up. If you are cutting prints in this manner, always cut in PAIRS (a pair is one of each mirrored section), otherwise you could end up with a bunch of extra pieces of fabrics that are the wrong size/shape for piecing.
Since I didn’t have time to upload the solids video, here are some simple photos to show you want I mean about cutting out fabric accordion style:
1. Lay pattern on fabric, estimate how much you’ll need to fold it over by.
2. Fold over fabric, creating layers for how many pieces you need. I have two layers in this photo.

3. Cut around the template. I have two layers. One will be backwards, but since this pattern piece is symmetrical, when I flip it over it will still be the correct size.

4. See, they are both the correct size and shape. 🙂 and that was faster then cutting them out individually. 🙂


