
First, you need all your tools.
TOOLS:
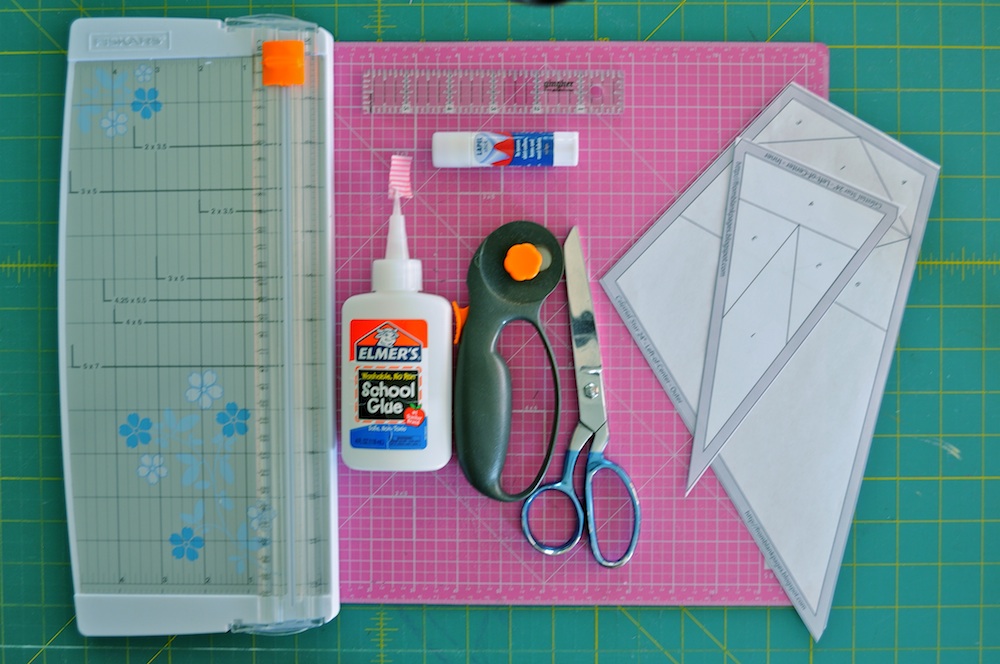
You don’t need anything too specific or expensive. And if you don’t have something I show here, you can probably improvise. Here are my go-to paper piecing tool must-haves.

- Cutting mat
- Rotary cutter: I use this one – style shown in the photo. I’ve tried a LOT of different styles, and this is the only one I can use for an extended period of time without my carpel tunnel flaring up.
- Ruler: I have used all sorts of big and square rulers, until I found “the one”! I use a 6″ by 1″ clear ruler with 1/4″ markings (the markings are a must!). It is so much easier to use due to the thin size of it.
- Add a 1/4 ruler (not pictured): I have since added this to my tools and I LOVE it! It’s so much easier to use to quickly trim those seam allowances!
- Glue stick: a lapel stick or fabric glue stick work WAY better than the Elmers school glue stick (the Elmers doesn’t hold the fabric to the paper well enough, but it’s better than nothing.) You can find these at Joann’s with a coupon or on sale, or from Amazon.
- Elmers Washable School Glue: YES! get some!
- Glue tips: Buy these ones from Cristy. I do have some that I sell when I’m teaching or lecturing, but otherwise you can buy them online from her. They are amazing! and they have changed with way I sew everything – even clothing. If you use these, make sure to buy the school glue with the blue “let’s bond” square on the back – the bottles with the black square don’t fit the glue tips.
- Scissors
- The basics: thread, sewing machine, …
- Iron and ironing board
- Light source: For the longest time I used a light table that I had growing up in the 80’s. 😀 I recently found some inexpensive ones on Amazon and I LOVE it! the brightness and sleek design make it a lot easier to use and travel with. I have this one.
- A light source could also be a window on a sunny day, the screen on your sewing machine (yep, I’ve done it), a lamp with a transparent shade, a clear piece of plastic (or glass coffee table) with a light behind it. Be creative, there are a lot of things you can use out there. But I definitely recommend finding something! You need a light source to help you see the pattern lines through the paper and sometimes multiple layers of fabric. The darker your fabric, the trickier it can be to see them.
- Pattern pieces (which means you need a computer, printer, paper, scissors or a paper cutter for cutting out the pattern pieces).
- Cutting templates: These are included all my patterns (perhaps not my oldest patterns), and are awesome for saving fabric waste and making paper piecing so much simpler. They are also great for fussy cutting!! You can learn more about cutting templates in this post.
- Any fabric requirements that I include for paper piecing patterns are based off using the cutting templates to cut out your fabric.
Second, Cut out all your fabric!

It takes so much more time to stop and cut more fabric between every step of the paper piecing process, so I always cut all my fabric out first. Cutting fabric is even faster when you use the cutting templates included in my pattern. (see how I use them here.) Or follow the tutorial at the end of this post to make your own cutting templates.
Be sure to organize all your fabric so you don’t get confused as to which sections the cut fabric goes with. I usually will keep the cutting templates with the piles of cut fabric. I also LOVE these mini design boards to keep the sections organized – keeping all the fabric for one pattern template per board.
For the Celestial Star block, I start by sewing all the center sections first (shown on the left) and then move on to the outer sections (shown on the right).

Here I have the fabrics covering the corresponding sections on the pattern.
You can see my small block of what my pattern will look like. What is pictured will make up 6 of my wedges. I’ll make these first, and then move onto my next 6 wedges.
1. Place pattern print side down (away from you) on your light source. With glue stick, glue a little line over section 1 of the pattern. This helps hold the first fabric in place so it doesn’t shift. I don’t use liquid Elmer’s glue because I find that it’s hard to remove the paper after. The glue stick is strong enough to keep the fabric in place, but doesn’t leave a mess.

2. Place your first fabric down so the edges extend past all sew lines by a minimum of 1/4 inch.

3. Orient you second fabric over the section it will cover, with right
side (RS) up. This is a helpful step to ensure that your fabric is oriented correctly. Sometimes it needs to be flipped or turned. Using the cutting templates make these next few steps much easier! Determine which edge will be sewn down.

The edge that will be sewn down is the edge that is overlapping the first fabric.
4. Flip fabric over so it is RS down. Fold over the edge that will be sewn by an even 1/4″ to 3/8″. Be careful not to stretch the fabric as you fold. (This step really only works this easily if you have used the cutting templates. Otherwise you may need to adjust more until the fabric is just right.)

Make sure that when you fold the fabric, the amount you fold it is even all the way down the fold. Cristy has a great tip in her tutorial for Paperless Paper Piecing that would also work fantastically in this step: See Prepare the Turning Template, and the first few steps of preparing your fabric – before layering.
5. Draw a thin line of glue to the outside of the first sew line (the line between sections 1 and 2. I will highlight the line in step 8).

6. Keeping the folded edge folded under, flip the second fabric over so it is RS up. Line up the fold with the sew line. Check that the fabric extends past the other sew lines and pattern edge by at least a 1/4 inch. As you handle the folded fabric, be careful you don’t pull it or distort it as you work with it. Press down and secure in place in the glue.

7. Unfold the fabric so it is all RS down facing your first fabric. The crease should be aligned with the sew line.

8. Flip the pattern over so the print is now up and the fabric is on the bottom. Careful that the fabric doesn’t shift (this is where gluing really helps!) I have marked the first sew line in pink.

9. Shorten your sewing machine stitch length, I set mine to 1.5 (This makes paper removal later much easier), and sew on the sew line. I start a little before and sew until a little bit after the line starts and stops.


Here is what it looks like on the other side.
10. Fold paper back at sew line so just the seam allowance is extending past the paper. Place on your cutting mat with paper side up.

11. Line up your ruler with the fold of the paper, so the 1/4 inch marks are lined up with the paper fold.

12. Use your rotary cutter and trim the excess fabric, giving you a clean 1/4 inch seam allowance.

Keep your hand on your ruler! This is one handed for picture taking purposes ONLY. 😉

13. Unfold the paper. Press the seam with your iron. This sets the seam.

14. Fold the fabric back so it is covering the correlating section. Press.

15. Repeat with the next section.
(I’ll be adding more photos tomorrow to walk you through the entire process of paper piecing these patterns.)
Pretty basic, right?! Now, let’s speed it up.
SHORTCUTS
All my shortcuts are the same steps as above. Simply set on fast forward.
Chain piece: Instead of doing each step for one segment at a time, group the steps and repeat for all the segments before moving onto the next group of steps. Do a group of steps with one pattern piece, set aside, and repeat with the next pattern piece. Set aside and repeat until completed with each like pattern. (Like I mentioned before, I usually do a group of pattern pieces at a time. For example, I’ll complete all the steps with the inner blocks before moving on to the outer blocks.) Here is how I group my steps:
Steps 1-6: glue the first piece with the glue stick. Glue the second piece with elmers glue.
Steps 7-8: sew the second fabric on the sew line.
Steps 9-11: Trim the 1/4″ seam allowance.
Steps 12-13: Press the seam to set, iron back the second fabric.
Then repeat with the next section.
Piece Double-Time: Sometimes the pattern you are making has sections that are opposite each other, not connected, and can be pieced at the same time. For example, in the outer pattern piece, sections 3 and 5, and 4 and 6 are opposites. There is no definite order in which they NEED to be pieced. Piecing these at the same time is like cutting your time in half, almost. 😉
Here’s what it looks like:

See how in the diagram sections 3 & 6 on the left, and 4 & 5 on the right, are not connected to each other. These can be pieced at the same time.
Glue both pieces down at the same time (either 3 & 6 or 4 & 5 –
they must be done in these pairs). Then sew both seam lines at a time* while chain piecing. Sew down one seam line, pull out the pattern piece enough to get to the end of the other sew line and sew down that second line. Super quick!
*Sometimes one fabric piece extends past the sew line of the opposite side. Be sure to move the fabric out of the way so the end doesn’t get sewn into the wrong seam.
And that’s about it. Seems basic enough, but it works for me! The little things have really shown to make a great difference in the time it takes me to piece anything. 🙂 If you try it, I’d love to hear what you think, if anything helps you. I love your feedback about trying the cutting templates! I’m so glad you like them! 🙂
Be sure to share your progress in the link up below! If you are on Instagram, use hashtag #CelestialStarQAL or #fbpCelestialStar. 🙂
Here’s where I got today with my second block while I waited for the video to load… movies take a long time. But hopefully it’s worth it. 😉


