Resize the Alphabet

Do you love using the My First Alphabet paper piecing pattern, but need a different size than what’s available? You’re in luck! Here are some paper piecing instructions to help you resize your pattern to just what you need!

The following instructions work with any of my alphabet paper piecing patterns, and the concepts can be applied to any pattern.

First, let's talk printing

You can change the size in the printing dialog box when you go to print. I print mine from Preview on my Mac, so that’s where my screenshots are from. The print dialog box may be different on your computer, but the main features will be there, you just might need to look for them.
Β 
To keep the pattern at the correct size (3 inches tall), make sure that your settings are set to 100%, or it may say “no scale”.
MFA Print Dialog Scale blog

Scaling

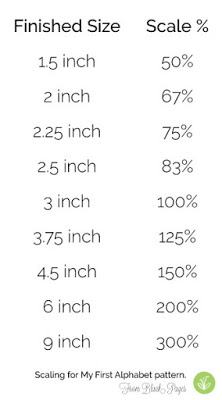
If you would like to change the size of your pattern, here are some different percentages that you can scale your pattern to.

3 inch Pattern

This is IMPORTANT

If you do scale your pattern by even the smallest amount, the seam allowance will no longer be an accurate 1/4 inch. Included in the pattern is instructions on how to adjust this. I did take a few pictures yesterday of when I made my pattern pieces 2 inch tall.
Β 
First I scaled down the pattern in the print dialog before printing to 67% and then printed it.
IMG_20160919_151829989 blog

To adjust the seam allowance, align the 1/4″ mark on your ruler with the INSIDE line (I drew over it in green) of the seam allowance (SA – the shaded area). Draw a line all the way down the side (it will be larger than the printed SA if you scaled down, and inside the SA if you scaled up).

IMG_20160919_151931797 blog
*** Which reminds me. If you scaled your pattern larger, you really don’t have to redraw the SA. Since it is big enough, it’s easy to trim down once you are done piecing it. You will have more scraps left over, but it will save time. So pick your benefit, right?! πŸ™‚
Β 
*** The reason why I highly recommend redrawing them if you scale down is because if you don’t extend your fabrics far enough past the seam allowance, it’s going to make for some real trouble when you go to join your letters or sew them to other fabric. I would fail miserably if I committed myself to remembering to add extra fabric around the outside as I pieced. I know that’s how some people make their patterns and/or paper piece. And that’s great if that works for you. But I want to use my brain as little as possible while I’m piecing to avoid messing up as much as possible. If I know my SA are accurate ahead of time, that’s one less thing I have to think about while I’m piecing.
Β 
So… repeat that step of aligning your ruler with the inside line, and then drawing a line down the entire side of the pattern template, until you have done that on all sides.
IMG_20160919_152022439 blog

Next I shade in all of the new SA so I know exactly what is what.

IMG_20160919_152050780 blog

Then cut out around the SA. Now I have a 2″ (finished) letter with a 1/4″ SA.

IMG_20160919_153702959 blog
For letters that have multiple sections, you’ll need to print out a copy for each section, since the pieces are so close together the new SA will overlap (unless you didn’t scale it down by much, they might still fit.)


Now you have small letters with an accurate seam allowance! Hooray!

Enlarging

I talked about shrinking the pattern, but I didn’t really mention enlarging the pattern. That’s because making the letters bigger, is much more of a hassle. At least in my PDF viewer, Preview on the Mac, I can’t specify how my enlarged image fits in the printing area, so if I enlarge my pattern, it just centers it and I don’t get any complete letters.
Β 
You can print them all out, cut them out, scan them all back in one by one and then scale/print from there, or even skip the scanning and just scale and copy the pattern templates. But that’s a lot of work. If you like that kind of thing, awesome!! High fives all around.
Β 
But I don’t like work. (Ok, I do, but not unnecessary work.) So this is why I cam out with the 6 inch pattern. You can easily scale down the pattern to a size larger than the 3 inch pattern, and maybe it’ll be easier to enlarge it than the 3 inch pattern would be…

Piecing Tips

Here’s a tip. If you know me, you know I LOVE using cutting templates when I paper piece. But can you imagine cutting out cutting templates for all these letters? I only love them so much. πŸ˜‰
Β 
To make piecing these letters easier, here’s a quick tip:
Β 
All of the letter sections in this pattern are a pretty consistent width. This means that you can cut strips that are 1 1/4″ wide or wider, and then cut those strips to length depending on the letter you are piecing. If you are using the same fabric for the letters, you can simply cut a few 1 1/4″+ strips, and go from there! It will save you time by not needing to stop and cut every step along the way. No one has time for that!

These strips will be enough to cover all of the vertical letter sections. I will need a few more strips for the horizontal sections. If you are using directional prints, but the fabric 1 1/4″+ tall, and then trim the width based on the section.

Don't have the pattern yet???

Leave a Reply

Your email address will not be published. Required fields are marked *

This site uses Akismet to reduce spam. Learn how your comment data is processed.